|
On this page:
Pen
Holding the pen
Pencil
Mechanical Pencils
Paper
Page turning
Pen
The ideal is a lightweight flex nib fountain pen, filled from an ink bottle
rather than sealed cartridges, so that it can be kept full at all
times. A transparent ink chamber or a window showing the ink
level is helpful.
A very fine nib
may catch the paper until you become accustomed to writing more delicately with it, and a thick a nib will not make clear outlines.
The nib needs to be flexible to produce the thick and thin strokes
of Pitman's Shorthand.
Black ink is
easier to read back, especially as it will be on the desk whilst
you type up the notes, and not held close to the eyes. Permanent
black may be required in your particular
employment, if the notes have to be kept as part of the
records.
Keeping
the cap on the pen is an unnecessary burden, the cap acts as counterweight to the nib, working like a stabiliser
against the fine movements you are trying to make,
and its length gives it added leverage. These things
matter in the speed stakes. Anything that slows you down will increase the errors
as you struggle to keep up, and so accuracy is also compromised. During real employment dictation,
I found it useful to keep the cap tucked between myself and the pad, and slip the pen into it during a lull, so that
the nib ink does not dry out. You can do this discreetly without it looking as if you are packing up for the day.
A dry tip can also be encouraged to flow by
dabbing on a wet tissue, something to keep handy during a meeting
when there may be long pauses.
Never, never, never use drawing ink or Indian ink in your
fountain pen, it is not designed to wash out when dried.
A pen sold for
shorthand may be designed for another system that does not require a
flexible nib, so caution is needed. Gold will be flexible; a gold
plated or steel nib may not suit Pitman's Shorthand unless
specifically designed to be flexible.
The present trend for biros, gel and other hard-tipped pens,
including cheap steel fountain pens, can encourage high pressure
longhand writing, so be kind to your new pen until you re-accustom your
writing habits. The exertion of pressure will slow down your
writing. If the ink does not flow readily, change to a smoother
paper rather than press on the nib.
Using a broad italic nib to obtain
wide and narrow lines is entirely unsuitable for shorthand.
The JPGs throughout the
websites are produced using real shorthand/flex nib pens, and so are
attainable by anyone in real-life
writing situations. In its beginning years (mid 1800s) Pitman's Shorthand
was encouraged for daily personal use, not just for speed writing by
reporters and office workers. People would have been using dip pens, hence the delicate and very
small outlines in the shorthand manuals of that century, easy to
emulate using the fine nibs when writing diaries and personal
letters at normal handwriting speed.
Top of page
Holding the pen
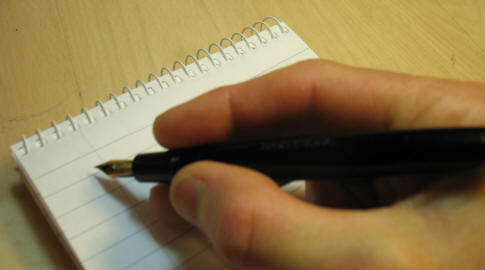
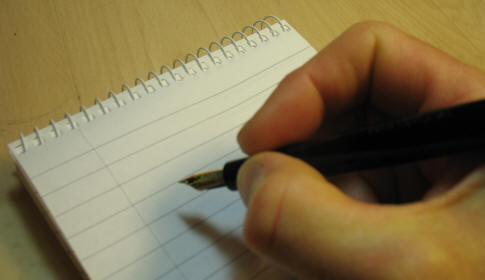
Hold the pen:
-
Near the nib for maximum flexibility and control
in making the small distinctions of the outlines. This is the
opposite of what you might do for an artistic drawing. Unlike
handwriting, shorthand outlines cannot be distorted very far
into a personal writing style.
-
Between the thumb and index finger, level with
each other, and the underside of the barrel resting on the
middle finger. This allows maximum range of movement by the
fingers. Movements made with the fingers are more accurate and
efficient than using your wrist or arm. Horizontal
movement of the whole hand from left to right along the notepad
paper, as writing proceeds, is achieved by the arm, while the movement of the fingers
is dealing with forming the outlines themselves.
-
Only the tip or side of the little finger or the outside
base of the hand should rest on the paper, lightly so that it
can glide easily over the paper.
-
The non-writing hand is ready to take hold of the bottom
corner and flip it over quickly and firmly, so that the paper
goes right over and does not fall back onto the pen.
-
The pad should be angled so that you can write a
long vertical stroke like Tee just by drawing the fingers and
nib inwards. This will avoid the outlines
gaining any unwanted slant. The pad will then be at the same
angle as your forearm.
-
The various shapes are achieved by the motion of
the fingers, and not by changing the angle of the hand itself,
therefore the hand will need to move along the line.
Twisting the hand round to get curves will produce drawing
rather than writing and will hold back the rapid formation of
outlines.
Many other finger combinations for holding the pen result in a tight locked-in grip,
with the arm having to make all the movements. The arm and the hand
as a whole cannot perform the fine control needed to write lightly, neatly
and rapidly, whether longhand or shorthand.
Top of page
Maintain a light touch
Whether pen or pencil, digging
into the paper is a hindrance. I am sure most teachers have a
version of what my shorthand teacher told us, "We are not gardeners,
don't dig!" It ruins the nib and slows you down. How alarming to
suddenly find your shorthand is suddenly embellished by a few hairy
strands of the paper stuck in the nib, or the pencil lead snaps and
flies off into space. Worse, bending
the nib, which can happen gradually as the nib
gives way under excess pressure.
A tight grip reduces finger movement and hastens fatigue. It can be
caused as much by mental tension as anything else, and needs to be
dealt with firmly whenever it is noticed. Past high-speed
writer Emily D Smith said in one of her books, that some pupils hold
their pens tightly as if in fear of the imminent approach of the
pen-snatcher.
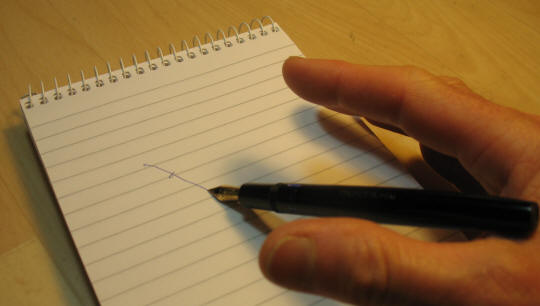
Try this test: rest the pen
between the thumb and forefinger, without actually gripping the pen.
Drag the nib over the paper. The pen should write under its own
weight. If it does not, improve the ink flow by cleaning the pen,
using a paler ink that has less pigment solids, and using smoother paper –
or maybe not leaving the pen baking on a sunny corner of your desk!
If your pen passes this test, it becomes clear that the only
pressure you need to exert on the nib is the slight one to achieve
the thick strokes. Any more than that is wasted effort, shortening
the life of the nib, cramping your writing style and slowing your
speed.
Pens can be cleaned by filling with water and leaving overnight to
soften any dried ink within, followed by a good flushing until
the pen expels only clear water. If a pen
runs out of ink during the day and you cannot refill, then fill with
water to prevent drying out.
If you run out of ink in the pen and the ink bottle is not
available, filling the pen with water will give you some extra writing time, by diluting the residue
of ink in the pen, meaning that you can carry on writing a bit
longer. I have found that it remains acceptably dark and perfectly
readable.
Ideally you will have spare full pens, or spare sharpened pencils,
ready by your side for that eventuality.
Never use drawing ink of any
colour, it cannot be rewetted and will dry permanently hard inside the pen and ruin it.
Some inks described as permanent only become permanent when the ink
combines with the cellulose in the paper (or your clothing), hence
the claims that they are both washable and permanent, and therefore
safe to use in a fountain pen. Reading up on the behaviour of modern
inks is advisable, to protect your precious fountain pen from an
avoidable disaster.
Top of page
Pencil
Pencils are ideal for the beginner, and it is
possible to get to high speeds without having to buy a pen at all. The
pencil should be just soft enough to form the thicks and thins, but
not so soft it wears down very quickly.
The principal attributes are:
-
Lead
that does not break easily
-
Degree
of hard/softness of the lead
-
Smooth
lead with no gritty bits
-
Circular
body better than hexagonal if writing for long periods
The pencil should be HB hardness, which is the
middle of the hardness/softness range. Too hard (H series, for
"Hard") will not produce the line thickness variation, and too soft
(B series, for "Black") will blunt too quickly. Have a good supply at hand, ready sharpened, and
consider sharpening both ends, if you need a new point in a hurry,
using point protectors if necessary. A
well sharpened point is much easier to write with and to produce the
thick lines without too much pressure.
A very hard pencil is ideal for going over your facility drills
and if you use it lightly, virtually no mark will be made, so you
can keep reusing the same page of shorthand. This is an ideal
activity when you are time-filling in public place.
Pencil is preferable when taking intermittent
notes, such as during a telephone conversation, or composing or
editing pages of notes, when there are long time-gaps between
outlines, which would result in a dried nib.
One other advantage of pencil is that you can
practise unobtrusively. You can write extremely small with a sharp
tip, the pale grey cannot be seen by a bystander and you will be
left to continue in peace.
If your employment requires the shorthand notes to
be kept for legal purposes, then pencil is unlikely to be
acceptable, as it can be erased and altered.
Brief notes on pad angle/posture
are on the Notes for Beginners page.
Top of page
Mechanical Pencils
I do not recommend mechanical pencils for
shorthand writing. There is no time to advance the lead, whether top
or side click, unless you are going quite slowly and only taking
intermittent notes.
Additionally, fast writing
increases the pressure on the tip and the needle leads are too fragile
for that situation. You might mitigate
this by choosing one with as thick a lead a possible to reduce the
risk of breakage, but this does not overcome the issue of there
being no time to advance the lead.
I started with a
supply of very cheap wooden pencils, constantly in need of sharpening. I moved on to a
clutch pencil with a thick lead, which still needed sharpening, and
I used it for the whole of my shorthand course year, including the
exams. The lead was very thick so it lasted through the longer
dictations. It produced grey shiny notes and lacked clarity,
but at the time I knew no better.
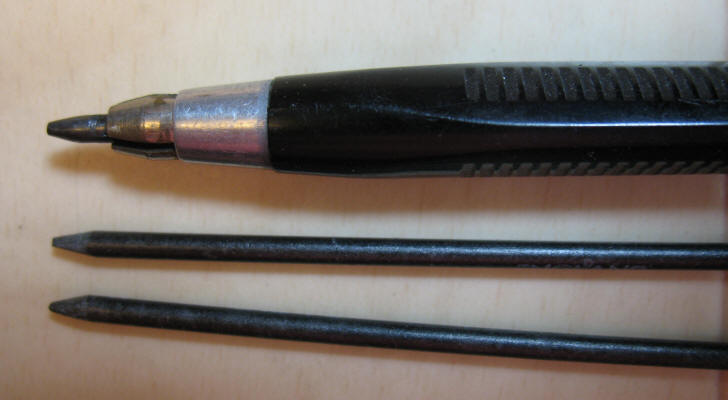
The old Ofrex
clutch pencil with 1.8 mm leads that saw me through my shorthand
learning and exams in 1973-4.
Between the lead and the smooth sleeve
can be seen the jaws of the clutch, in the same 3-part configuration as
a wood-working hand-drill. A clutch pencil is
different from mechanical pencils in that pressing the top (against
a very strong spring) opens the jaws, allowing the lead to fall out
under gravity, to the length
required. Holding it upside-down lets the lead fall back inside and
the jaws retract back into the sleeve. It does hold the lead right down to the last bit.
A few years
later, it was totally overshadowed by my first shorthand fountain
pen and the clutch pencil found a new
job as a drawing pencil. I tried it again for shorthand before
taking the picture and I found the thick grey greasy lead very unpleasant
after so many years of using ink.
Top of page
Eraser
Shorthand never uses an eraser/rubber. An incorrect
or unwanted outline is circled and then ignored during
transcription. If you need to highlight a word during the session,
do not circle it, but draw a square or triangle over it instead, in
order to differentiate.
You can circle during
transcription with a red pencil, to highlight outlines that need
correcting or looking up.
If you pencil has an
eraser at the end, cut it off and sharpen that end as well.
Top of page
Paper
Use a shorthand pad that is spiral bound at the top. The paper
should be good smooth quality, so that the pen nib glides along on
the ink trail. Rough absorbent hairy paper is of no use, it will
suck in and spread the ink, and shed fibres. Check your chosen pad
with the ink/pen you intend using, to ensure ink does not bleed dots
onto the reverse. If you use an extra thick pad, open out the pad into halves on the desk,
so your hand is not teetering on the edge all the time.
When you find a good pad, keep a goodly supply, so you are always
prepared. You will need separate pads for dictation and for fluency
drills. You will be making up your own fluency drill books, to be
used at any spare moment for practice. Your dictation book must be
blank, to prevent nasty surprises when you turn the page.
Draw all the margins on your
supply of pads, approximately 2 cm wide. The margin is used for
writing headings, sections or extra notes to
yourself, enabling you to go instantly to a particular place, or for rewriting a
doubtful outline, if you have time. The
margin is your essential key to hassle-free transcription and
ongoing improvement of your shorthand, and is not a luxury or a
waste of paper. If you have to use an unprepared pad, then quickly
dash down a margin as each page comes into use, as it is better to
have a wavy wild margin than none at all.
While drawing in the margins, look for blemishes on the paper and remove
those sheets – a mark can look like a shorthand dot or dash. If
during dictation you notice a blemish or greasy spot, avoid that
line by dropping down past it. If you have time, just circle it to
draw attention to it. If it keeps happening, change your make of pad
and use up the faulty ones on facility drills. If the expense of
good paper is putting you off doing lots facility drills, then use
cheap ones for that. However, low quality paper may get you
into the unhelpful habit of pressing hard to get it to take your
marks.
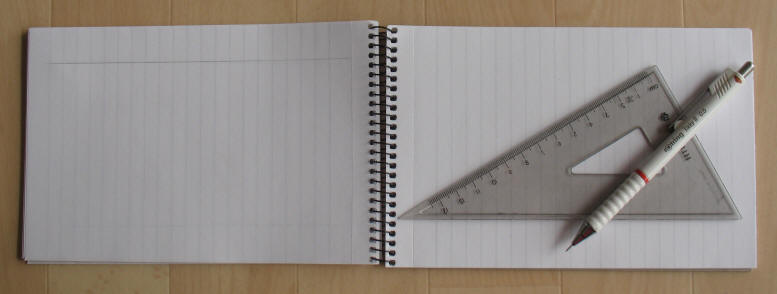
Quickest and easiest
way: do both sheets as you go through, and use a set square or a
similar shaped piece of thick card the same length as the page. It
is easier to grip and position than a ruler. Holding the pencil at a very shallow angle
ensures the line is done rapidly, without indentation.
I do not recommend the method of dividing the page
with a vertical line, in order to shorten the writing line. This
deprives you of the essential margin, doubles the number of
interruptions to the smooth flow of outlines and hinders phrasing
opportunities. However, this could be of use if you were taking down
from two speakers, so you can alternate between the sides. If you are forced
to use a lined A4 pad, then dividing the page into halves (both with
margins) makes sense.
The time-honoured method of taking down from two speakers
is to use two left hand margins, possibly different colours, and start each speaker at one or
other of the margins, having decided which margin "belongs" to whom.
This uses the page more economically, which means less page turning.
If you are not drawing margins, e.g. if they are already printed on,
always turn all the sheets. You could just fan the pad on all 3
sides but my experience is that the sticking occurs where the top
row of holes is punched – you turn the sheet and it springs back, or
takes the sheet underneath with it.
Ascertain what your make of pad needs by way of preparation.
Put the date at the beginning of each piece, plus speed (for learners) or dictator
(at work). Draw a diagonal line through
matter transcribed.
Keep a rubber band round the used pages, so that you always open the
book at the next fresh page. If you are likely to need to turn the
book over quite soon, then the band should be removed beforehand.
In employment, treat your dictation pad as a confidential item, as
it will contain correspondence and reports that would
normally be locked in a filing cabinet. Put your name and start date
on each pad, and use a separate pad for more casual items
like to-do lists or telephone messages.
If items need to be kept,
remove them as they occur, so that the final filled pad can be
shredded when the last item has been transcribed.
For minutes of
meetings or confidential items, use fresh pages, and then remove and
staple together all
those pages once transcribed and keep them separate and filed
securly, or with the
transcription, until the time comes when it is permissible to shred
them.
Print Your Own Shorthand Notepad 30-page PDF for low-cost practising,
on
Downloads
page.
Top of page
Page turning
In normal life this is of little importance but in shorthand you
need to perfect the action to minimise the interruption to your
writing. A bungled page turn can cause the loss of the next chunk of
dictation, and lose you an exam pass.
The ideal page turning scenario is this: as soon as you start a
page, the non-writing hand should get hold of the bottom corner of
the page, and gradually move the fingers up to the top of the page,
moving the paper upwards slightly.
By the time you have filled the page, your page-turning fingers will
be under a loop of paper at the top of the page, ready to flick it
over quickly. I tend to keep hold of the bottom corner and slide the paper up at suitable intervals,
thus keeping hold of the bottom corner all the time and flicking it
over at the last moment. This works for workplace dictation, with
its intermittent stops and hesitations.
The above is too fiddly for an
exam. Here, the best way is to get hold of the bottom corner as soon
as possible, and hold it in readiness for the quick final flick at
the last moment.
The following is the
page-turning method of past high speed writer Nathan Behrin (350 wpm
in a timed test in 1922):
Syllabus (2nd Year) Isaac
Pitman Shorthand (Roche/Riordon) p25
www.archive.org/details/syllabussecondye00rochiala
Students should be taught how
to shove up the page of a note-book skillfully while taking notes.
Mr. Nathan Behrin, an Isaac Pitman writer, holder of the world's
speed and accuracy records, and official court reporter in the New
York Supreme Court, under date of December 3, 1921, very kindly sent
the head of department the following description of his method of
shoving up the page:
"In my daily court work I use Pitman's No. 5 note-book, which is end
opening. Before using a new book, I rustle the leaves and bend the
book backward and forward so as to loosen the leaves and make sure
that they will not stick. Opening the cover, I commence writing on
the top line of the first page. The left hand lies palm downward at
the top of the page, the thumb resting against the left hand edge of
the book, the other fingers extended across the page. After I have
written on six or seven lines, with the under side of my left thumb
I begin to raise the left edge of the page until I can take hold
with my forefinger and thumb. I now start the page on its upward
slide. The thumb straightens and lies flat on the left margin of the
page, and the forefinger resumes its former straight position, but
now rests lightly against the fold created by the upward movement of
the page. Keeping pace with the writing, the thumb feeds the page
upward to the forefinger, which holds and steadies the fold of the
page and aids in the work of feeding the page to the other fingers.
As the writing reaches the last line, the bottom of the first page
is even with about the sixth or seventh line of the second page. A
quick shove of the first page sends it over, and my right hand is
writing on the top of the second page. The book lies flat all the
time. The right elbow remains in practically the same position on
the table. The writing hand travels from left to right on a fixed
plane. The page moves to accommodate the writing hand. The
transition from page to page is unnoticeable, as we have practically
a continuous page. When writing on the knee, the left thumb and
forefinger turn the pages in the same manner as when writing upon
the table, but the remaining fingers are under the book, palm facing
up, firmly holding the book from slipping."
(Note the shorthand examples
within the above book are pre-New Era)
Exams do not take up a huge
number of pad sheets, so it is worth your while to slightly curl up
or disturb the corners of enough pages, so that it is easy to get
hold of each one without fumbling.
Dry fingers cannot get a grip
on paper, so your non-writing finger-tips may benefit from a dab of
hand-cream just before the exam starts. Experiment beforehand.
Readers will always pause
slightly at the end of a sentence. You can use this to your
advantage if it occurs while you are on the 2nd or 3rd to last line,
using that opportunity to flip the page. This increases the amount
of page-turning slightly but that may be better than turning at the
moment you have to, rather than when you choose to.
If the pages stick together, turn over what you can and just carry
on regardless, and remove the blank ones later. You don't stop to tie
shoelaces in a race, but you do make sure it does not happen again.
There is no need to tuck pages under as you go,
just leave them lying where you
turned them.
Work through the pad using one side of the sheets, then turn over
and work back through the pad. it is not a good idea to start a dictation on last page
or two, because you will not have time to turn the book round; use
them for fluency drills.
Effective page-turning skills
need deliberate effort to form, because it is tempting when
practising to stop at the end of the page for a rest or to check up
on words, before continuing on with the next page. The correct
page-turning habit once formed needs no
further thought, in fact it becomes difficult to sit in front of any
shorthand pad without gripping the bottom corner in readiness for
whatever may happen next.
Top of page |